` GüLşah
Bayan Üye
Final Image Preview

Create a new document (Ctrl+N) in Adobe Photoshop with the size 800px by 1024px (RGB color mode) at a resolution of 72 pixels/inch. Use the Paint Bucket Tool (G) to fill with black color the new background layer.

Find a stock photo with a model represented on it, I used this photo from deviantart. I would like to thank the author of this photo. Remove the background using your favorite tools like Pen Tool (P), Magic Wand Tool (W), Magnetic Lasso (L) or even a simple Filter>Extract and insert it on a new layer in our main document. The girl’s sizes may be changed with Free Transform (Ctrl+T) command.

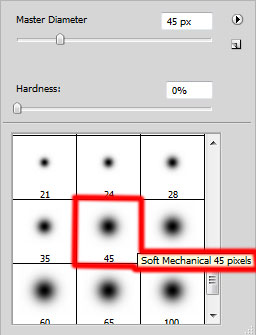
Create a new layer and select the Soft Round brush.

Use this brush to paint the background behind the girl’s legs with this color - #25709F.

Use now the Pen Tool (P) to represent a shape which must be placed lower than the girl’s layer. Set the drawing mode on Shape Layers in Options bar and draw the next shape as shown. Fill = 0% for this layer.

Next we have to represent a new layer again and use here also the Soft Round brush to paint the edges of the shape.

The brush’s color is shown on the picture:

Let’s create a clipping mask to make the content of the layer containing the brushes only visible within the content of the layer containing the shape. Hold down Alt (Windows) or Option (Mac OS) and click between layer with brushes and the layer with shape (on the Layers panel).

We’ve got the next result:

Now we have to make a copy of the layer containing the shape (change the Fill value on the copy on 100%). Use after that the Direct Selection Tool (A) to make smaller the copy’s layer by moving the anchor points of the shape. Create then a new layer above the copy’s layer of the shape and choose the same Soft Round brush to paint the shape’s edges.

Press Alt button and click between the brush’s layers and the shape’s copy layer (on the Layers panel) to create a clipping mask.

We’ve got the next result:

Press D to return the Foreground and Background color to default black and white.
Now we have to create a new layer again and choose on it Filter>Render>Clouds. Place the layer under the girl’s layer.

Click on the same layer on the bottom part of the Layers panel on Add layer mask icon and select the Soft Round brush of black color (Opacity 15%)

Use this brush to paint in the mask to hide the clouds background around the girl.

Click Add a layer style icon from bottom part of the Layers panel to add Color Overlay for the made layer:

We’ve got the next result:

Set the Opacity to 80% for this layer.

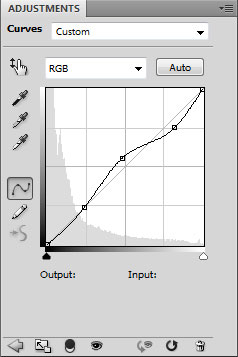
Click Create new fill or adjustment layer from bottom part of the Layers panel and select Curves to adjust the curve shape as shown to make a little color corrections.

Place the layer under the girl’s one.

Choose now the Rectangle Tool (U) to represent a rectangle. Place the layer under the girl’s one.

Set Fill to 0% for this layer and click Add a layer style icon from bottom part of the Layers panel to select Gradient Overlay:

Click in the color bar to open the Gradient Editor and set the color stops as shown. Click OK to close the Gradient Editor dialog box.

We’ve got the next result:

Click on the same layer on the bottom part of the Layers panel on Add layer mask icon and select the Soft Round brush of black color (Opacity 10%)

Use this brush to paint in the mask to hide the rectangle edges.

Make two copies of the layer containing the rectangle and place the copies the same way demonstrated next picture. Change the Gradient Overlay settings for the copy’s layer on the left side.

Open the Gradient Editor and set the color stops as shown. Click OK to close the Gradient Editor dialog box.

We’ve got the next result:

Now we have to select the Pen Tool (P) to represent a shape of black color and place the layer under the layer containing the girl (drawing mode is set on Shape layers in Options bar).

Click Add a layer style icon from bottom part of the Layers panel to select Drop Shadow:

We’ve got the next result:

Create a new layer and select the Soft Round brush of the color #FF00E3 (Opacity 20%).

Use this brush to paint the edge of the black shape:

Press Alt button and click between the layers on the Layers panel to create a clipping mask.

We’ve got the next result:

Create a new layer and select the Soft Mechanical brush of black color.

Use this brush to paint the other side of the black shape.

Next we must choose the Rectangle Tool (U) to draw a rectangle which may be inclined with Free Transform (Ctrl+T) command. Place the layer also lower than the girl’s layer.

Set Fill to 0% for this layer and click Add a layer style icon from bottom part of the Layers panel to select Gradient Overlay:

Open the Gradient Editor and set the color stops as shown. Click OK to close the Gradient Editor dialog box.

We’ve got the next result:

Make a copy of the last made layer and choose the same Free Transform (Ctrl+T) command to incline the copy’s layer, applying for it also different Gradient Overlay settings:

Set Fill to 0% for this layer and click Add a layer style icon from bottom part of the Layers panel to select Gradient Overlay:

Click in the color bar to open the Gradient Editor and set the color stops as shown. Click OK to close the Gradient Editor dialog box.

We’ve got the next result:

Make one more copy of the rectangle’s layer and choose the Free Transform (Ctrl+T) command to incline also the copy’s layer.


Press D to return the Foreground and Background color to default black and white.
Create a new layer again and choose for it the Filter>Render>Clouds. Place this layer lower than the girl’s one.

Now click on the same layer on the bottom part of the Layers panel on Add layer mask icon and select the Soft Round brush of black color (Opacity 15%).

Use this brush to paint in the mask to hide the clouds background around the girl.

Set the Blending mode to Overlay for this layer.

Make a copy of the last made layer.

Create a new layer and select the Paint Bucket Tool (G) to fill it with black color.

Apply on the same layer Filter>Noise>Add Noise

We’ve got the next background:

Apply for the same layer also Filter>Filter Gallery>Texture>Craquelure

We’ve got the next result:

… and also apply Image>Adjustments>Curves (CTRL+M) to adjust the curve shape as shown to make a little color corrections on this layer.

We’ve got the next result:

Set the Blending mode to Screen for this layer.

Click Create new fill or adjustment layer from bottom part of the Layers panel and select Curves to adjust the curve shape as shown to make a little color corrections.

We’ve got the next result:

Press Alt button and click between the girl’s layer and the Curves adjustment layer (on the Layers panel) to create a clipping mask.

We’ve got the color correction visible just in the girl’s layer.

Create a new layer and select the Soft Mechanical brush.

Use this brush to represent this time the shadow on the girl’s body the same way shown on the next picture.

Set the Blending mode to Color for this layer and press Alt button and click between the layers on the Layers panel to create a clipping mask.

We’ve got the next shadow on the girl’s body.

Create a new layer and select the Soft Mechanical brush to paint the hair as it is shown next picture. The brush’s color is violet (Opacity 15%).

Press Alt button and click between the layers (on the Layers panel) to create a clipping mask.

We’ve got the next result:

Use the Rectangle Tool (U) to represent a rectangle which must be inclined with Free Transform (Ctrl+T) command.

Set Fill to 0% for this layer and click Add a layer style icon from bottom part of the Layers panel to select Gradient Overlay.

Open the Gradient Editor and set the color stops as shown. Click OK to close the Gradient Editor dialog box.

We’ve got the next result:

Click on the same layer on the bottom part of the Layers panel on Add layer mask icon and select the Soft Round brush of black color (Opacity 20%).

Use this brush to paint in the mask to hide the layer edges as shown.

Make a copy of the layer with the rectangle and choose Free Transform (Ctrl+T) command to incline the copy’s layer.

Set Fill to 0% for this layer and click Add a layer style icon from bottom part of the Layers panel to select Gradient Overlay:

Open the Gradient Editor and set the color stops as shown. Click OK to close the Gradient Editor dialog box.

We’ve got the next result:

Use the same method applied before by inserting the layer mask on the copy’s layer and select the Soft Round brush to paint in the mask to hide the rectangle edges.

Make one more copy of the rectangle’s layer. Apply the Free Transform (Ctrl+T) command to incline the copy’s layer.

Set Fill to 0% for this layer and click Add a layer style icon from bottom part of the Layers panel to select Gradient Overlay:

Click in the color bar to open the Gradient Editor and set the color stops as shown. Click OK to close the Gradient Editor dialog box.

We’ve got the next result:

On the next new layer we’ll choose the Soft Round brush of black color (Opacity 20%).

Use this brush to dark out the top part of the document.

Create a new layer and use again the Soft Round brush of different Master diameter and different Opacity value to draw many white dots.


Click Add a layer style icon from bottom part of the Layers panel to select Outer Glow:

We’ve got the next result:

Create a new layer and select the Soft Round brush of white color.

Use this brush to paint arbitrary as shown to increase the brightness.

Set the Blending mode to Overlay for this layer.

Click Create new fill or adjustment layer from bottom part of the Layers panel and select Curves to adjust the curve shape as shown to make a little color corrections.

We’ve got the next result:

Select once again Create new fill or adjustment layer from bottom part of the Layers panel and click to Hue/Saturation.

Drag the slider to the right to increase the Saturation of the color range.

Finished!


